Typewritered
Boxes still clutter corners and my brain is going to explode from lack of organization soon, and yet on Sunday night, I could not suppress my need to create any longer. Thus, my first DIY project in our new home!

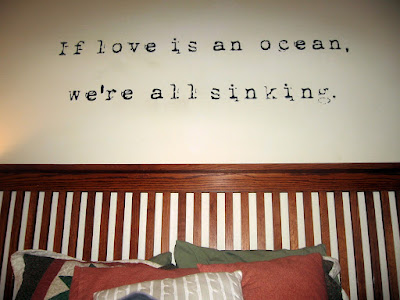
"Look Herb, someone typewritered on our wall!"
"Typrewritered? Seriously?" Herb asked.
That's the best way I can describe the font called 1942 Report, one of my favorites!

I have to give credit to my friend Steph, who has the quote in her nursery, and also note that it comes from one of my favorite songs, How He Loves {with some artistic liberties taken}.
I like this quote above our bed for several reasons...

First, I designed the lettering using 1942 Report font in Sure Cuts A Lot. I cut the words at 5 inches on the Cricut. I ended up using about 12 sheets of 6"x12" black matte vinyl. If you are cutting vinyl on a Cricut, set the speed to 2, the pressure to 3, and the blade depth to 3. This will cut the vinyl without cutting the backing.
Black vinyl is available at craft stores, and costs about $10 for two 12"x24" pieces. I bought my vinyl from H and H Sign Supply. You can get black vinyl {or just about any other color} and it costs $3 for a 12"x36" piece. If you Google around, you might be able to find a coupon code, too.
Also, you should know, if you are making your own wall quote, you also need to buy transfer tape. Once your vinyl is cut, you peel away the negative space so your word alone is still on the backing. Next you lay transfer tape over the vinyl, peel away the backing, and place the transfer tape and vinyl word on the wall. Gently remove the transfer tape, and ta-da!

"Look Herb, someone typewritered on our wall!"
"Typrewritered? Seriously?" Herb asked.
That's the best way I can describe the font called 1942 Report, one of my favorites!

I have to give credit to my friend Steph, who has the quote in her nursery, and also note that it comes from one of my favorite songs, How He Loves {with some artistic liberties taken}.
I like this quote above our bed for several reasons...
1. It has the word love in it. {In the song, the line is "If grace is an ocean we're all sinking."}
2. The word love applies to Herb and I, but also is a daily reminder to me about how much God loves us, too.
3. I really wanted to put a vinyl quote above our bed because we have a huge king size bed so I needed something that could take up a large space, but that could also be created on the cheap. Since I already had all the materials on hand from other vinyl projects (here, here, and here), this was essentially free!

First, I designed the lettering using 1942 Report font in Sure Cuts A Lot. I cut the words at 5 inches on the Cricut. I ended up using about 12 sheets of 6"x12" black matte vinyl. If you are cutting vinyl on a Cricut, set the speed to 2, the pressure to 3, and the blade depth to 3. This will cut the vinyl without cutting the backing.
Black vinyl is available at craft stores, and costs about $10 for two 12"x24" pieces. I bought my vinyl from H and H Sign Supply. You can get black vinyl {or just about any other color} and it costs $3 for a 12"x36" piece. If you Google around, you might be able to find a coupon code, too.
Also, you should know, if you are making your own wall quote, you also need to buy transfer tape. Once your vinyl is cut, you peel away the negative space so your word alone is still on the backing. Next you lay transfer tape over the vinyl, peel away the backing, and place the transfer tape and vinyl word on the wall. Gently remove the transfer tape, and ta-da!


Comments
Post a Comment
I love feedback!